XAMPP をインストール後の設定等のメモ
Postscripts
htdocsのパス変更。"C:\xampp\apache\conf\httpd.conf"を編集。例:変更前
C:/xampp/htdocs変更後Z:/htdocs1234DocumentRoot "C:/xampp/htdocs"<Directory "C:/xampp/htdocs">を
1234DocumentRoot "Z:/htdocs"<Directory "Z:/htdocs">MySQL のデータディレクトリの変更。
"C:\xampp\mysql\bin\my.ini"を編集。123456789[mysqld]....datadir="z:/mysql/data"...innodb_data_home_dir="z:/mysql/data"...innodb_log_group_home_dir="z:/mysql/data"PHP 設定。
"C:\xampp\php\php.ini"編集。12345678910111213141516171819202122error_reporting=E_ALL & ~E_DEPRECATED & ~E_NOTICE & ~E_STRICT...[mail funciton]...sendmail_path = "C:\xampp\sendmail\sendmail.exe -t"...[XDebug]zend_extension = "C:\xampp\php\ext\php_xdebug.dll"xdebug.remote_enable = offxdebug.profiler_enable = offxdebug.profiler_enable_trigger = offxdebug.profiler_output_name = cachegrind.out.%t.%pxdebug.profiler_output_dir = "C:\xampp\tmp"xdebug.force_display_errors = 1xdebug.force_error_reporting = 1xdebug.overload_var_dump = 1xdebug.show_local_vars = 1sendmail の設定。
"C:\xampp\sendmail\sendmail.ini"を編集。以下は相応のものに書き換え。
–{my email address}
–{account name given by sakura internet}
–{my email account password}123456789101112131415161718192021[sendmail]smtp_server={account name given by sakura internet}.sakura.ne.jpsmtp_port=587smtp_ssl=tslerror_logfile=error.logauth_username={my email address}auth_password={my email account password}pop3_server=pop3_username=pop3_password=force_sender={my email address}force_recipient=hostname=その後、次のような PHP コードでメールの送信テスト。
12345678910111213<?PHP$sender = '{sender email adress}';$recipient = '{recipient email address }';$subject = "php mail test";$message = "php test message";$headers = 'From:' . $sender;if (mail($recipient, $subject, $message, $headers)) {echo "Message Sent";} else {echo "Error";}参考: https://www.arclab.com/en/kb/php/how-to-test-and-fix-php-mail-function.html
phpMyAdmin の設定
そのままだと
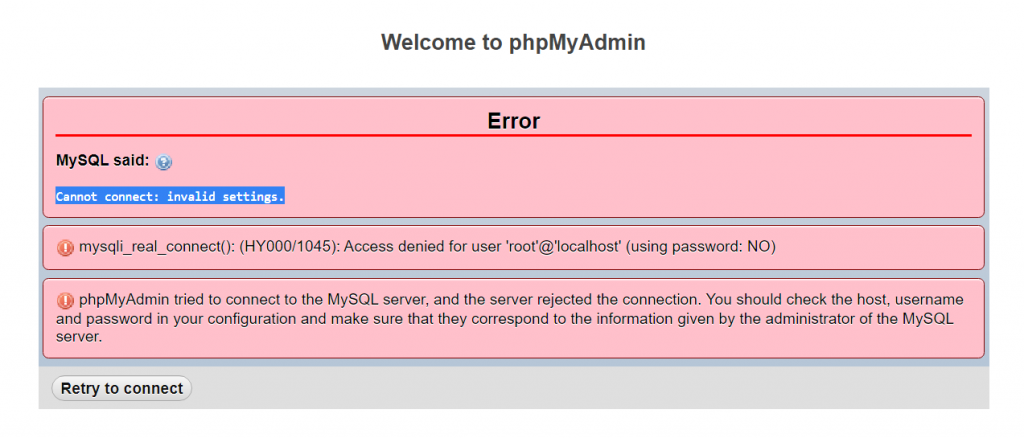
http://localhost/phpmyadminにアクセスしても、Cannot connect: invalid settingsというエラーが出る。次のようなエラーがでる。

"C:\xampp\phpMyAdmin\config.inc.php"を開き、次の箇所を編集。12$cfg['Servers'][$i]['user'] = 'root';$cfg['Servers'][$i]['password'] = '';参考: https://stackoverflow.com/questions/7180893/mysql-said-cannot-connect-invalid-settings-xampp
MySQL のバージョンが上がっている場合、MySQL Workbench で、”Tables could not be fetched” と出て読み込めない場合がある。

その時は、コントロールパネル -> Shell -> 次のコマンドを実行。
 1mysql_upgrade -u root -p
パスワード聞かれるので入力して後は処理を待つだけ。


