WordPress の投稿一覧ページで、Quick Edit のボタンから素早くタクソノミーを追加したりする人も多いだろう。プラグインやテーマの開発で、独自のインプットフィールドをそこに配置する必要がある場合がある。今回はその方法を紹介する。
できるだけ手順の流れを把握しやすいように、シンプルにするため、今回は、親記事の ID を設定できるフィールドを表示させる。カスタム投稿タイプで hierachical オプションが有効になっている場合は必要ない機能だが、無効になっていて、記事をツリー型表示させたい場合など、凝ったカスタマイズをする時に必要になってくる。
ちなみにこの方法は WordPress 4.9.8 以降にサポートされているフックを使うので、それ以前のバージョンでは動かない。
はじめに
流れ
流れを軽く説明。
- 記事リストテーブルに、カスタムカラムを挿入
- タイトルの非表示インライン要素に
post_parentデータを埋め込む - クイックエディットにフィールドを挿入
- JavaScript でユーザーが Quick Edit ボタンを押した時に、フィールドに設定された値を表示させる
- CSS でカラムの幅を調整
- デフォルトで挿入したカラムを非表示設定
準備
- WordPress 4.9.8 以上
- 目的のカスタム投稿タイプのスラッグ。ここでは
noteで進める - テーマの
functions.phpに書き込むことを想定 - 同階層に
/js/quick_edit_post_parent.jsというJavScript ファイルを作成
カスタマイズ
PHP クラスの作成
まず、フックとコールバックをひとところにまとめる PHP クラスを作ってあげる。これで関数が散らかったりすることもなく、不要になった時にクラスと関連ファイルだけ取り除けば何事もなくなるというクリーンな状態を保つことができる。
テーマの functions.php に書き込むことを想定しているが、実際自分で実装する時は、クラスごとにファイルを作ってあげてオートロードさせてやるとか工夫すればよい。ここではその説明はしない。
|
1 2 |
class TwentySeventeenTechnotes_ParentPostQuickEditForTutorial { } |
目的の投稿タイプ以外はカスタマイズが適用されないようにするため、コンストラクターに指定の投稿タイプのスラッグを渡し、それをプロパティに格納。
|
1 2 3 4 5 6 7 |
public $aPostTypeSlugs = array(); // e.g. note public function __construct( $asPostTypeSlug ) { $this->aPostTypeSlugs = ( array ) $asPostTypeSlug; } |
インスタンス化をして、コードが実行されるようにしておき、カスタマイズが適用されているか確認しながら進める。ここでは、note という投稿タイプのスラッグを渡して、その投稿タイプでのみ今回のカスタマイズを適用させてね、としている。
|
1 2 3 4 |
class TwentySeventeenTechnotes_ParentPostQuickEditForTutorial { // 中略 } new TwentySeventeenTechnotes_ParentPostQuickEditForTutorial( 'note' ); |
記事一覧テーブルにカスタムカラムを挿入
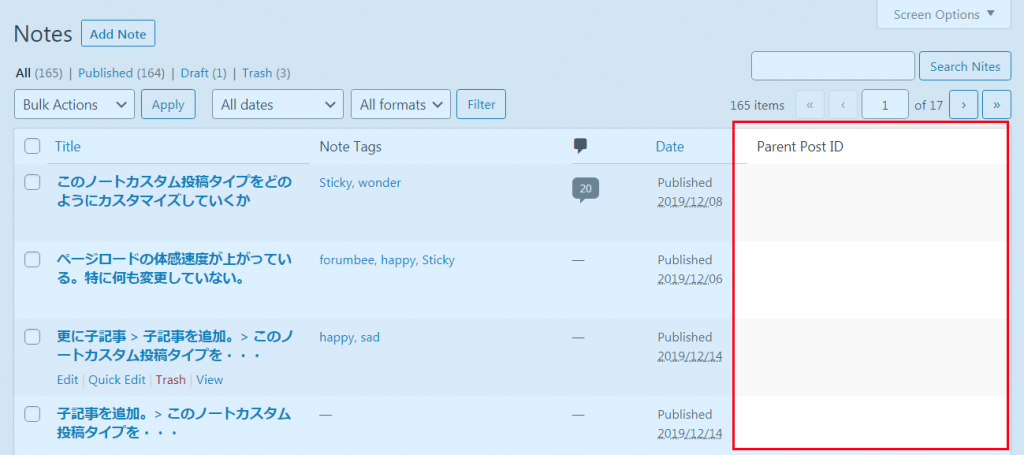
クイックエディットにフィールドを挿入するのになんでカスタムカラム挿入するのと思うかもだが、クイックエディットに挿入するためのフィルターフックが、カスタムカラムが無いと発動しないので、その為。後に、このカラムはデフォルトでは批評に設定のカスタマイズを行うため、ユーザーには取り散らかった印象は与えないようにすることができる。
コンストラクターに以下のフックをかけ、コールバックメソッドを配置。
manage_edit-{投稿タイプスラッグ}_columns フィルター
ここではカラムの ID は post_parent としている。
|
1 2 3 4 5 6 7 8 9 10 11 12 13 14 |
public function __construct( $asPostTypeSlug ) { $this->aPostTypeSlugs = ( array ) $asPostTypeSlug; foreach( $this->aPostTypeSlugs as $_sPostTypeSlug ) { add_filter( "manage_edit-{$_sPostTypeSlug}_columns", array( $this, 'replyToAddColumns' ) ); } } public function replyToAddColumns( $aColumns ) { $aColumns[ 'post_parent' ] = __( 'Parent Post ID', 'twenty-seventeen-technotes' ); return $aColumns; } |
この状態で、こんな感じになる。
manage_{投稿タイプスラッグ}_posts_custom_column アクション
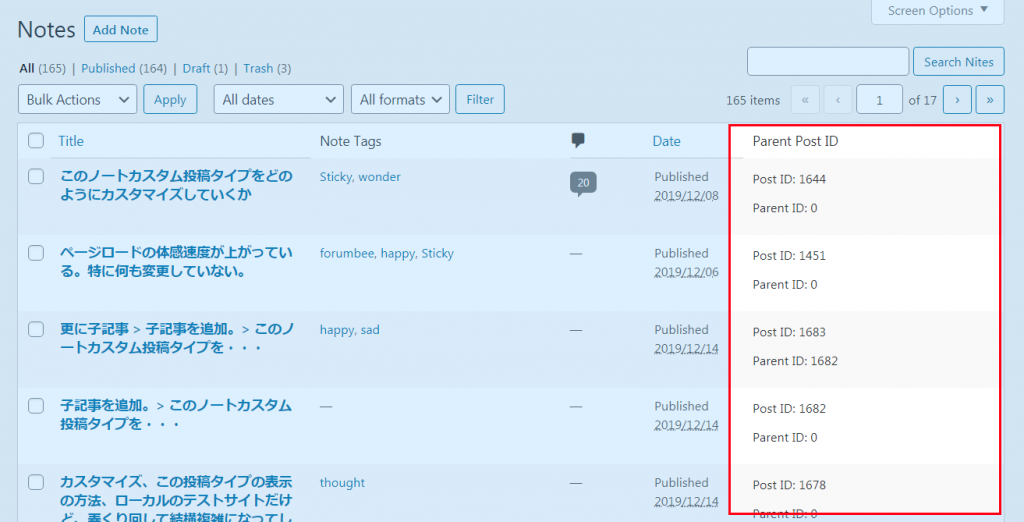
次に、カラムの内容を表示させる。ここでは 記事 ID と親記事 ID を表示。コンストラクターを次のように書き換える。manage_{ポストタイプスラッグ}_posts_custom_column フックが追加されたことに留意。
|
1 2 3 4 5 6 7 8 9 10 |
public function __construct( $asPostTypeSlug ) { $this->aPostTypeSlugs = ( array ) $asPostTypeSlug; foreach( $this->aPostTypeSlugs as $_sPostTypeSlug ) { add_filter( "manage_edit-{$_sPostTypeSlug}_columns", array( $this, 'replyToAddColumns' ) ); add_action( "manage_{$_sPostTypeSlug}_posts_custom_column", array( $this, 'replyToPrintColumnContent' ), 10, 2 ); } } |
そして、対応するコールバックメソッドも追加。
|
1 2 3 4 5 6 7 8 9 10 |
public function replyToPrintColumnContent( $sColumnName, $iPostID ) { if ( 'post_parent' === $sColumnName ) { $_oPost = get_post( $iPostID ); echo "<p>" . __( 'Post ID', 'twenty-seventeen-technotes' ) . ": {$_oPost->ID}</p>"; echo "<p>" . __( 'Parent ID', 'twenty-seventeen-technotes' ) . ": {$_oPost->post_parent}</p>"; return; } } |
で、こんな感じになる。
指定投稿タイプの判定
次に、指定した投稿タイプのスクリーンかどうかを判定し、それに該当するときのみ、処理を進めるようにしたいため、current_screen アクションフックをかます。コンストラクターに次を追加し、該当するコールバックメソッドも追加。
|
1 2 3 |
add_action( 'current_screen', array( $this, 'replyToSetUp' ) ); } // end of __construct() |
|
1 2 3 4 5 6 7 8 9 10 11 12 |
public function replyToSetUp( WP_Screen $oScreen ) { if ( ! in_array( $oScreen->post_type, $this->aPostTypeSlugs ) ) { return; } if ( 'edit.php' !== $GLOBALS[ 'pagenow' ] ) { return; } // ここにコードを追加していく } |
次に、クイックエディットのパネルにフィールドを挿入。上の // ここにコードを追加していく の箇所に以下を挿入。
|
1 |
add_action( 'quick_edit_custom_box', array( $this, 'replyToAddFieldInQuickEdit' ), 10, 2 ); |
該当するコールバックメソッドを追加。
|
1 2 3 4 5 6 7 8 9 10 11 12 13 14 15 16 17 18 19 20 21 22 |
public function replyToAddFieldInQuickEdit( $sColumnName, $sPostType ) { if ( ! in_array( $sPostType, $this->aPostTypeSlugs ) ) { return; } if ( 'post_parent' !== $sColumnName ) { return; } echo "<fieldset class='inline-edit-group wp-clearfix'>" . "<div class='inline-edit-col'>" . "<label class='alignleft'>" . "<span class='title'>" . __( 'Parent Post', 'twenty-seventeen-technotes' ) . "</span>" . "<span class='input-text-wrap'>" . "<input type='number' name='post_parent' class='post_parent' min='0' step='1' style='text-align: right; width: 100px;'>" . "</span>" . "</label>" . "</div>" . "</fieldset>"; } |
この時点でこんな感じになる。
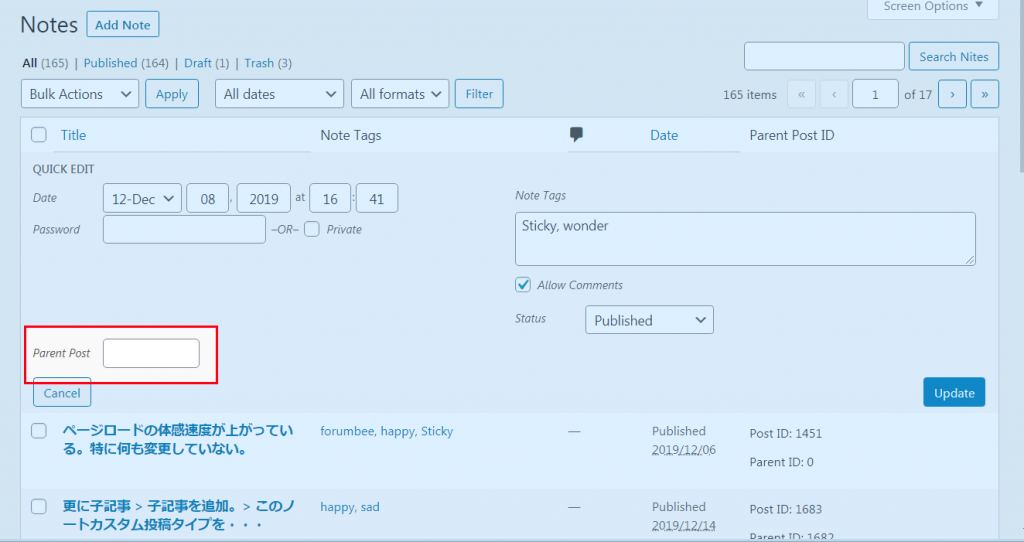
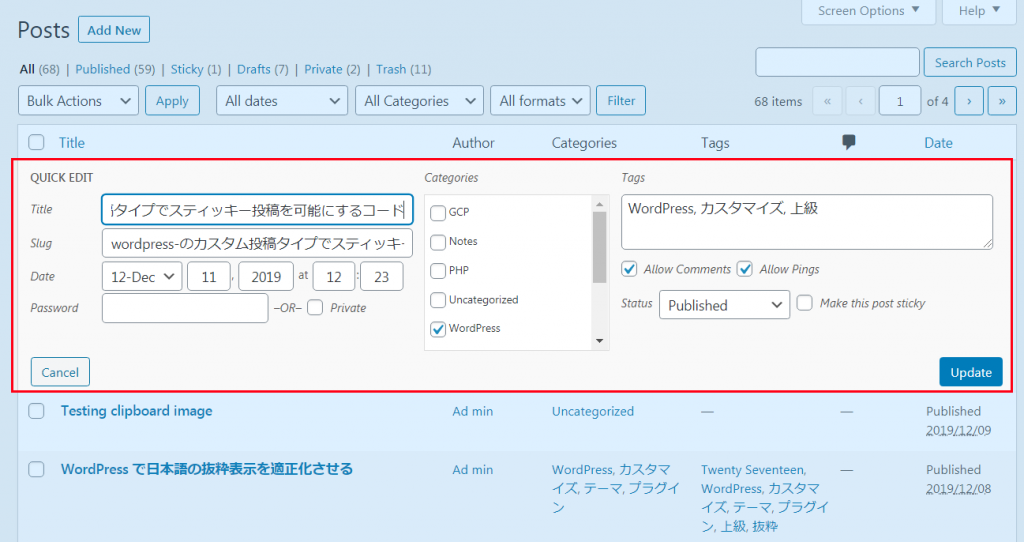
他の投稿タイプで来ていないか確認。大丈夫、来てないね。
JavaScript でインプットフィールドの値をアップデート
この状態だと、ユーザーがクイックエディットを開いた時点で値が設定されおらず、Update が押されると、空の値が送信されてしまう。親記事が設定されていなければ問題ないが、既に設定されている場合など問題だ。そこで、JavaScript でこの値を自動挿入させてあげる。
JavaScript 側から値を参照する為に、データを非表示で埋め込んであげる。その為に add_inline_data フィルターフックを使う。次を先程の replyToSetUp() メソッドに追加。
|
1 |
add_action( 'add_inline_data', array( $this, 'replyToAddInlineData' ), 10, 2 ); |
そして、該当するコールバックメソッドも追加。
|
1 2 3 4 5 |
public function replyToAddInlineData( WP_Post $oPost, WP_Post_Type $oPostType ) { if ( ! $oPostType->hierarchical ) { echo '<div class="post_parent">' . $oPost->post_parent . '</div>'; } } |
これで Title カラムの中に非表示でデータが埋め込まれる。
次に、JavaScript を読み込む。先程の replyToSetUp() メソッドに、次を追加。
|
1 |
add_action( 'admin_enqueue_scripts', array( $this, 'replyToEnqueueResources' ) ); |
該当するコールバックメソッド。
|
1 2 3 4 5 6 7 8 9 |
public function replyToEnqueueResources() { wp_enqueue_script( 'quick-edit-post_parent', get_stylesheet_directory_uri() . '/js/quick_edit_post_parent.js', array( 'jquery' ), // dependencies false, // version true // in footer ); } |
読み込むための JavaScript スクリプト。これは、functions.php と同階層に js ディレクトリを作成しその中に, quick_edit_post_parent.js というファイル名で保存。この場所は任意。違う場所に保存の場合は上の wp_enqueue_script() の URL の値も該当するものに変更。
|
1 2 3 4 5 6 7 8 9 10 11 12 13 14 15 16 17 18 19 20 21 22 23 24 25 |
jQuery(document).ready( function($){ if ( 'undefined' === typeof inlineEditPost ) { return; } var $inline_editor = inlineEditPost.edit; inlineEditPost.edit = function( id ){ $inline_editor.apply( this, arguments); var post_id = 0; if( typeof( id ) == 'object') { post_id = parseInt( this.getId( id ) ); } if( ! post_id ){ return; } var $row = $( '#edit-' + post_id ); var _oInline = $( '#inline_' + post_id ); var _iPostParent = _oInline.find( '.post_parent' ).text(); $row.find( 'input.post_parent' ).val( _iPostParent ? _iPostParent : 0 ); } }); |
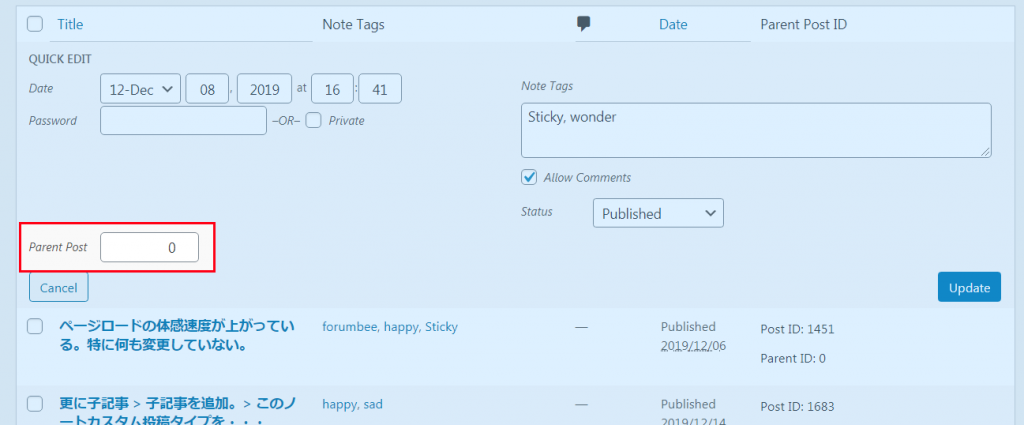
この時点で、Quick Edit を押すと、値が入力されている。ちなみに未設定の場合は 0 となる。
カラムの幅を修正
そのままだと、カラムの幅が広い。表示する内容も特に多くないため、幅を狭くしたい。次を replyToSetUp() に追加し、該当するコールバックも追加。
|
1 |
add_action( 'admin_head', array( $this, 'replyToPrintStylesheet' ) ); |
|
1 2 3 |
public function replyToPrintStylesheet() { echo "<style type='text/css'>.column-post_parent{ width: 10%; }</style>"; } |
追加したカスタムカラムをデフォルトで非表示設定
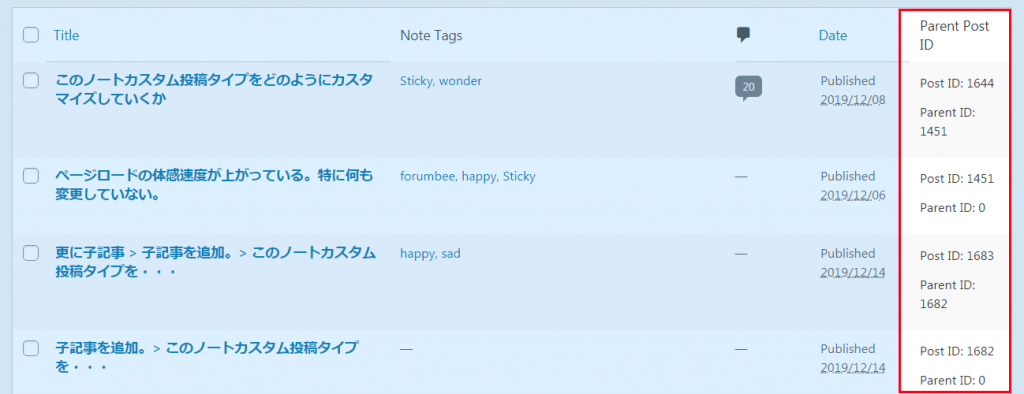
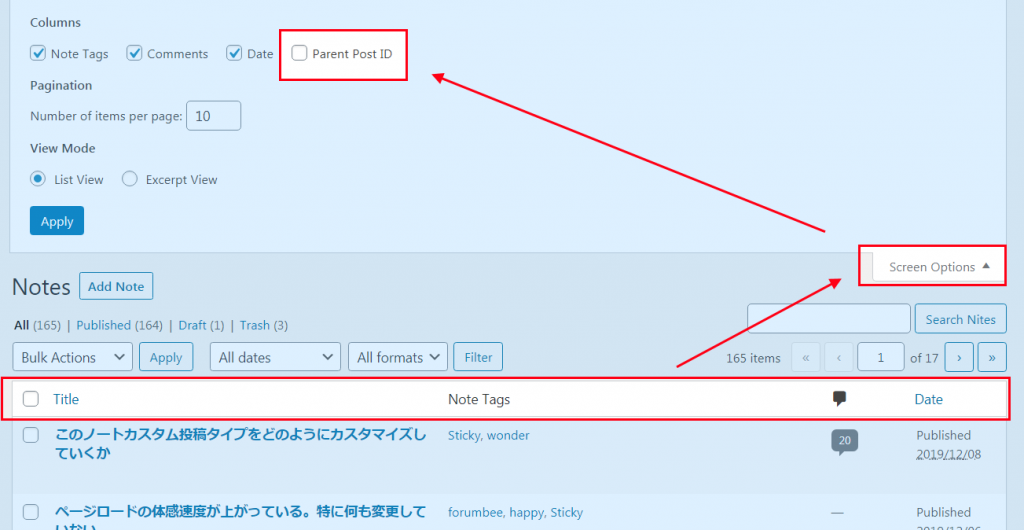
この時点でほぼほぼ完成だが、ユーザーにとってカスタムカラムが必要ない場合、デフォルトで非表示にしてやることが可能。必要なユーザーは右上の Screen Options から有効にすればよい。次を replyToSetUp() に、そして、対応するコールバックメソッドも追加。
|
1 |
add_filter( 'default_hidden_columns', array( $this, 'replyToSetDefaultHiddenColumns' ), 10, 2 ); |
フィルターで渡される配列に、カスタムカラムの ID post_parent を追加。
|
1 2 3 4 5 6 7 8 9 |
public function replyToSetDefaultHiddenColumns( $aHidden, WP_Screen $oScreen ) { if ( ! isset( $oScreen->id ) ) { return $aHidden; } $aHidden[] = 'post_parent'; return $aHidden; } |
PHP コード全部
全体のコードはこんな感じ。付随する JavaScript スクリプトは上に挙げたとおり。配置するファイルのパスに気をつけて。
|
1 2 3 4 5 6 7 8 9 10 11 12 13 14 15 16 17 18 19 20 21 22 23 24 25 26 27 28 29 30 31 32 33 34 35 36 37 38 39 40 41 42 43 44 45 46 47 48 49 50 51 52 53 54 55 56 57 58 59 60 61 62 63 64 65 66 67 68 69 70 71 72 73 74 75 76 77 78 79 80 81 82 83 84 85 86 87 88 89 90 91 92 93 94 95 96 97 98 99 100 101 102 103 104 105 106 107 108 109 110 111 112 113 114 115 116 117 118 119 120 121 122 123 124 125 126 127 128 129 130 131 132 133 134 135 136 137 138 139 140 141 142 143 144 145 |
/** * Adds the Parent Post input field in the Quick Edit pane. * * @requires WordPress 4.9.8 or above as it uses the `add_inline_data` action hook. */ class TwentySeventeenTechnotes_ParentPostQuickEditForTutorial { public $aPostTypeSlugs = array(); // e.g. note /** * Performs necessary set-ups. */ public function __construct( $asPostTypeSlug ) { $this->aPostTypeSlugs = ( array ) $asPostTypeSlug; // This should be added here (not in current_screen) for Ajax requests. // And without adding a custom column, a custom quick edit field cannot be added as the callback is not fired foreach( $this->aPostTypeSlugs as $_sPostTypeSlug ) { add_filter( "manage_edit-{$_sPostTypeSlug}_columns", array( $this, 'replyToAddColumns' ) ); add_action( "manage_{$_sPostTypeSlug}_posts_custom_column", array( $this, 'replyToPrintColumnContent' ), 10, 2 ); } add_action( 'current_screen', array( $this, 'replyToSetUp' ) ); } public function replyToSetDefaultHiddenColumns( $aHidden, WP_Screen $oScreen ) { if ( ! isset( $oScreen->id ) ) { return $aHidden; } $aHidden[] = 'post_parent'; return $aHidden; } public function replyToSetUp( WP_Screen $oScreen ) { if ( ! in_array( $oScreen->post_type, $this->aPostTypeSlugs ) ) { return; } if ( 'edit.php' !== $GLOBALS[ 'pagenow' ] ) { return; } add_action( 'quick_edit_custom_box', array( $this, 'replyToAddFieldInQuickEdit' ), 10, 2 ); add_action( 'add_inline_data', array( $this, 'replyToAddInlineData' ), 10, 2 ); add_filter( 'default_hidden_columns', array( $this, 'replyToSetDefaultHiddenColumns' ), 10, 2 ); add_action( 'admin_head', array( $this, 'replyToPrintStylesheet' ) ); add_action( 'admin_enqueue_scripts', array( $this, 'replyToEnqueueResources' ) ); } public function replyToEnqueueResources() { wp_enqueue_script( 'quick-edit-post_parent', get_stylesheet_directory_uri() . '/component/posts/js/quick_edit_post_parent.js', array( 'jquery' ), // dependencies false, // version true // in footer ); } public function replyToPrintStylesheet() { echo "<style type='text/css'>.column-post_parent{ width: 10%; }</style>"; } /** * Called after outputting the fields for the inline editor for posts and pages. * * @remark The hook requires WordPress 4.9.8 or above * * @param WP_Post $post The current post object. * @param WP_Post_Type $post_type_object The current post's post type object. */ public function replyToAddInlineData( WP_Post $oPost, WP_Post_Type $oPostType ) { // If hierachical, the `post_parent` is already aded. // This adds the `post_parent` to non-hierachical post types. if ( ! $oPostType->hierarchical ) { echo '<div class="post_parent">' . $oPost->post_parent . '</div>'; } } /** * Add columns to the listing table of the post management page * * @param array $aColumns * @return array */ public function replyToAddColumns( $aColumns ) { $aColumns[ 'post_parent' ] = __( 'Parent Post ID', 'twenty-seventeen-technotes' ); return $aColumns; } /** * Add column contents to the listing table of the post management page * @param string $sColumnName * @param int $iPostID * * @return string */ public function replyToPrintColumnContent( $sColumnName, $iPostID ) { if ( 'post_parent' === $sColumnName ) { $_oPost = get_post( $iPostID ); echo "<p>" . __( 'Post ID', 'twenty-seventeen-technotes' ) . ": {$_oPost->ID}</p>"; echo "<p>" . __( 'Parent ID', 'twenty-seventeen-technotes' ) . ": {$_oPost->post_parent}</p>"; return; } } /** * Inserts an input field in the Quick Edit pane. * @param string $sColumnName Custom column name, used to check * @param string $sPostType * * @return void */ public function replyToAddFieldInQuickEdit( $sColumnName, $sPostType ) { if ( ! in_array( $sPostType, $this->aPostTypeSlugs ) ) { return; } if ( 'post_parent' !== $sColumnName ) { return; } echo "<fieldset class='inline-edit-group wp-clearfix'>" . "<div class='inline-edit-col'>" . "<label class='alignleft'>" . "<span class='title'>" . __( 'Parent Post', 'twenty-seventeen-technotes' ) . "</span>" . "<span class='input-text-wrap'>" . "<input type='number' name='post_parent' class='post_parent' min='0' step='1' style='text-align: right; width: 100px;'>" . "</span>" . "</label>" . "</div>" . "</fieldset>"; } } new TwentySeventeenTechnotes_ParentPostQuickEditForTutorial( 'note' ); |
あとがき
今回は、クイックエディットにカスタムフィールドを挿入して、親記事を変更できるようにするカスタマイズを紹介した。
既知の問題として、値を変更した直後に、もう一度 Quick Edit を押すと、値が表示されない。内部ではデータは変更されているのでページをリロードする必要がある。これに関してはまた分かることがあれば追記したい。
